
Once you have completed the initial wizard steps you should have the basic structure complete and a number of web pages created. You can fully edit all aspects of the website at any time and continue creating new pages, adding galleries and much more. The process is very simple and if you have trouble you can refer to the help below. However, if you require any assistance whatsoever we are always on hand to assist.
New March 2018: Create additional websites under a single account. Additional websites have the same tools as the main account and this allows the user to test different options such as layouts and colour schemes before deciding on the final design.
This feature allows the main account holder to produce multiple website for a number of reasons. This maybe to provide an additional service in creating websites for clients. Additionally, for wedding service providers, an account holder may wish to provide websites to wedding clients such as a bride / groom website.
The main home or 'Account' page has links to the individual sections and you can access all sections from the top menu on any page.
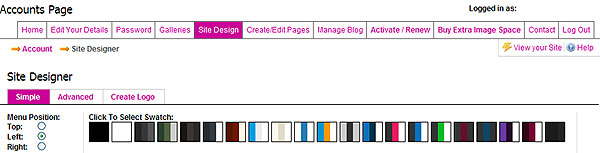
You can edit the look of the website at any time from the 'Site Design' tab in the top menu. Here you will find 3 tabs 'Simple', 'Advanced', and 'Create Logo'. Most of these features are self explanatory:
 Simple
This allows you to change the colour scheme using a selection of swatches similar to the wizard steps. Simply hover your mouse over the different styles and see the snapshot below change as you move. Click the colour scheme you prefer and then click the 'Use This Swatch' button. You can tweak the colour scheme as required from the 'Advanced' tab.
To change the layout simply select Top, Left or Right under the 'Menu Position' header and see the layout change in the snapshot below. This simply moves the menu to the desired location altering the layout of the web site globally. Once you have selected your desired layout click the 'Save Position' button.
AdvancedThe Advanced section allows you to edit the global settings and also drill down and edit the individual sections of the page. Each section here allows you to edit text and background colours and text font creating your own unique look. Simply make your selection on the relevant section. Remember to click 'Save Changes' before navigating to a different section.
Layout and DesignFrom here you can change global settings of the website including site width, font and font size, layout, site background colour, borders etc.
Background ImageHere you have a number of options for a background image. Select from our library of thumbnail images and these will automatically tile throughout the website as the repeat X and Y checkboxes are selected.
You may also create your own background image to give your website a more unique feel. You can create an image in any image editing program such as Photoshop and upload to the website. You can tile the images throughout the site by selecting both the Repeat X and Y options or select only Repeat X or Repeat Y. Repeat X repeats the image horizontally across the screen and repeat Y repeats vertically. Therefore if you create a tall narrow image you will probably only wish to Repeat X whereas a short wide image running across the screen can be set as Repeat Y to run down the screen. You can also select to place the image Left, Right or Centre of the X Axis.
You may wish to use one large image as a backdrop to your website, selecting one of your favourite photographs for example. If so you may want to set your main content colour to transparent from the Content Design tab. Once your content is transparent you should then use your image editing software to fade out the central section of the image so that any text is readable. If your web site is set to 900px wide then the central section of the image should be 900px wide, similarly for 1200px. If your website is set to 100% width then we don't recommend the fading option but use a subtle image that contrasts well with your text colour. When using a large image you should select the Centre option. It is advisable not to select the Repeat X but you may select Repeat Y as this will then display on longer pages.
Header/LogoUpload a header image or logo to replace the text heading. If you have a professionally designed logo or header image or are familiar with Photoshop or other image editing software we recommend uploading this to use as your main header to the website. This can give the website a far more unique appearance. The size of the header should be a maximum of 900px wide by 250 px high to give the desired look. If either size is larger than this the system will resize it during upload to fit in the available space.
Simply click the 'Upload New Logo' button and select the image you wish to use. If at any time you do not wish to use the logo you can unclick the check box which will place the text heading back in. You can upload a new header image at any time.
If you don't have a logo or are unable to create a header for upload then our Create Logo is very useful which is explained below.
Menu DesignEdit the font and font colour of the main links menu along with the background of the navigation bar. Here you can also add a gradient style behind the links to replace the background colour and show or hide the separator between the links.
Content DesignEdit the background, text and link colour for the main content section. If you wish to use a background image you may want to see this behind the main content. In this case you are able to set the background colour to Transparent. Simply select the settings you require and click Save.
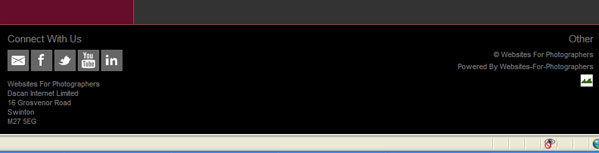
FooterEdit the font and background colour for the footer section. Here you can also change the branding of the footer link toggling between 'Websites For Photographers' or 'Dacan Internet'
Social ButtonsYou can also edit the content of your footer, select social media buttons add your contact information and more from the 'Edit Social Links section. More details here
 Editing the colour scheme / Colour Picker
From the 'Advanced' tab within the Design section there are a number of colour settings you can change using the colour picker..
For each, simply click the colour picker  and you will see the following screen pop-up.

Grab the right hand slider with your mouse and drag to the colour range you require.
Once selected, go to the main screen and click and hold the mouse down in the position you want. Drag this to the exact colour you require and click to save. Click off the pop-up to close.
As you drag the cursor you will see the hexadecimal number for the colour change. If you know the hex number you require you can simply type this into the relevant box and click away from the box to save.
Create LogoAs mentioned above we recommend uploading your own header or logo to give your website a more unique feel. However, the logo creator has been developed for those without this capability or do not wish to have a professional logo designed.
A logo can be created over 2 lines, generally for a business name with a strap line below. On visiting this page for the first time this will read your 'Business Name' on the first line and 'Photography Services' on the second. You can highlight this text and edit as you see fit. The font, font colour and font size can be edited for each line individually. The background colour can be changed to contrast the main scheme of the website or a similar colour depending on your personal preferences. As you change any settings these will appear in the snapshot below to give an idea of how the page will look.
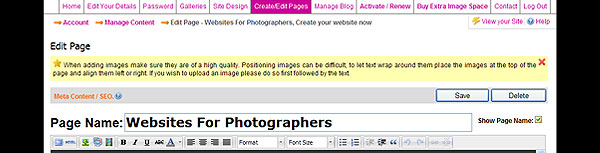
Each standard content page uses a simple text editor where you can edit all content for individual pages.
The page is split into the following 3 sections:
 Meta Content/SEO
Search engine optimisation can be added to main content pages using the Meta Content / SEO link. Title, Keyword and Description tags can be added here. Go to edit one of your content pages and above the Page Name field you will see the Meta Content / SEO link. Click this to open.
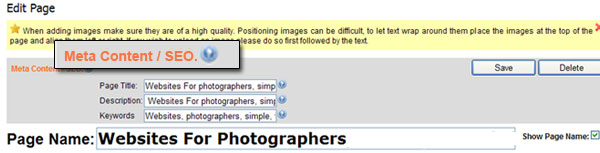
The title and description fields should be descriptive and relevant to the page content. The Title tag is the single, most important part of a page for search engines to determine how to rank a page and for what keywords or phrases. Include in here search phrases you would expect visitors to use to find your website and also include these phrases within the main content of the page. The Keyword field should contain the same words as the above phrases but with each word separated by commas. Each page of the website should contain different details in this section which is relevant to the page itself. This increases the number of phrases where your website can be found. All these details can be added at anytime.
Prior to setting the majority of web sites live we will add or offer to add basic SEO to the main content pages free of charge, assuming the client isn't familiar with this side of things. However, much of the basic on page SEO can be done by the client quite easily while creating individual pages. We have provided some additional information here.
To improve search engine rankings and traffic it is important to cover as many keywords or phrases as possible, relevant to your business or website. However, you should not try to cram all phrases in to one page such as your home page as this can reduce the relevance of each phrase. For your home page concentrate on one or two main phrases and maybe include a county or region, for example 'Wedding photography London'.
Once you have decided on your main one or two phrases you can create extra pages to target other phrases. As you can create unlimited pages this presents an ideal opportunity to cover as many phrases as you like, creating a new page for each.
You should utilise a main 'Services' page and add a little detail for each service you provide, i.e. 'Wedding Photography', 'Portrait Photography' etc. The heading for each service can then be made into a link to a new page specifically named Wedding Photography, Portrait Photography etc. For these new pages you can concentrate on one main phrase relevant to the page name, again including a region or town, i.e. ''Wedding Photography London', Portrait photography London'. These phrases can be added to the SEO section of the new page and you can then go on to cover that service in more descriptive detail. Once a new page has been created you can set this as a sub page to a main header link on the 'Edit navigation menu' Page. Dragging a page under a main header link will add it to a drop down list on the main navigation bar. The same process can be repeated for sections such as 'Venues' etc.
Go here for more SEO information.
The page name can be changed at any time and should be relevant to the page content. On some website this name or title may not give a desired appearance and for this reason there is the option to turn this off on each content page. To the right of the Page Name field there is a check box 'Show Page Name'. Deselect this if you do not wish to display the page name on this particular page. Remember to Save the page before moving on.
On the front end of the site the Page Name is a <h1> tag and can help with search engine rankings. However, you can add your own H1's from the editor if you wish to turn the page name off.
Main EditorExisting text can be edited or removed completely and new text added. To remove all content simply highlight with your mouse and click your delete button.
We recommend adding an image first which can then be positioned left or right, and then text can be added to wrap around the image. To upload an image, click your mouse in the position on the page you wish to add it and then click the Upload Image icon ![]() in the editor toolbar. Browse your computer for the image you wish to use. Once selected, click the Upload button. Then complete the description field which should include keywords as it helps with your search engine ranking. Align the image left or right by selecting from the Alignment drop down box and then click Insert. These images should be resized prior to upload to the size you wish it to appear. We do not recommend resizing an image on the page as some quality will be lost. The maximum size for image upload here is 150Kb. A slideshow can be added here instead of an image removing the requirement to resize an image first. Slideshow instructions are shown later.
in the editor toolbar. Browse your computer for the image you wish to use. Once selected, click the Upload button. Then complete the description field which should include keywords as it helps with your search engine ranking. Align the image left or right by selecting from the Alignment drop down box and then click Insert. These images should be resized prior to upload to the size you wish it to appear. We do not recommend resizing an image on the page as some quality will be lost. The maximum size for image upload here is 150Kb. A slideshow can be added here instead of an image removing the requirement to resize an image first. Slideshow instructions are shown later.
Add the text content you wish to wrap around this image by typing directly into the page or copy and paste from another program or web page. The text can be formatted as headers (H1, H2 etc), italicised or emboldened, colour and the text size changed using the tools in the toolbar. The text alignment, links, bullet points and text indenting can also be set using the editor tools.
Up to 5 images (or 4 images and 1 slideshow) can be added any content page. If you wish to centralise an image on the page, upload first and then click the Text Align Centre tool in the toolbar of the editor.
For those comfortable with HTML there is also the option to access the raw html code of the page content.
The changes should be Saved which will return you to the main Account page.
Addition of slideshows, Flash files and social networking links are explained separately.
The Websites For Photographers system includes an integrated blog feature. A blog is a great way to add extra relevant, quality content to a website quickly and easily. This can help with increasing search engine rankings and generating extra traffic. Relevant blog posts should be added on a regular basis.
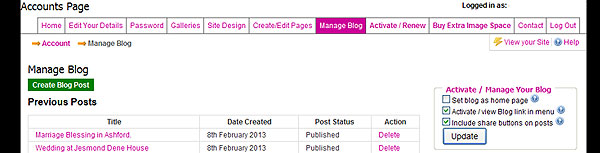
You have the option to activate the blog and set it as your Home page if you so wish. This is a great option if you do not have too much time to dedicate to creating numerous pages.
To activate your Blog simply go to the 'Manage Blog' tab in the main menu and select the settings you require to the right of the screen. Click 'Create Blog Post' to the left of the screen to add a new post.
Settings for your blog also include share buttons for social networking websites. Selecting this checkbox under 'Activate / Manage Your Blog' will place these buttons on all blog posts.
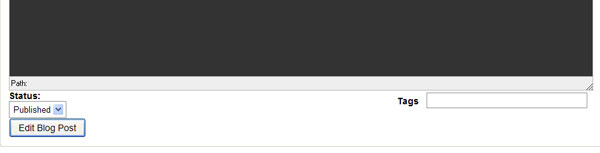
When publishing a post you can also add relevant Tags which will appear in the right or left hand column of the website depending on your overall layout settings.

When you initially view your website the footer will contain only your Copyright notice and our branding link to the right hand side.
You can edit the content of the footer and activate social media buttons from your main account page under 'Personalise Your Website', following the link 'Edit Social Links / Footer content'.
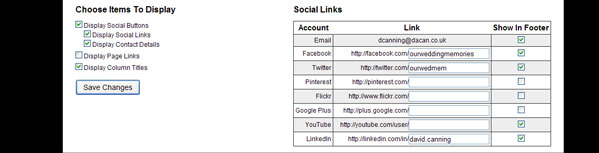
Here you can select to 'Display Social Buttons' and Contact Details in the footer. Simply select the options you wish to display and add your facebook, twitter, pinterest, flickr and other social media addresses to the right hand side. Deselect the checkbox for those you do not wish to appear. You should be able to find your username for the social media sites in any welcome emails or by visiting the relevant profiles and copying the address in the address bar.
Remember to click Save Changes before navigating away from this page.
You may if you wish display your site links here also, which will display vertically as a list to the right of the social buttons. This is probably not recommended where there are a large number of site links.
When selecting to display contact information in the footer, only information you have registered will display here. If not all information is available you should go to the 'Edit your Details' Tab in the top menu to complete this information.
From a design point of view we believe a website is enhanced when the background colour of the footer is set to a slightly different but complimentary colour to the main website. Different blocks of colour for the menu, main content, header and footer can add more depth to the design and these can be changed from the 'Site Design' tab.
A slideshow can be added to any content page using the editor bringing in all images from any gallery already created. To the left of the editor toolbar you will see the Add Widgets/Slideshow icon ![]() , click this to see the options available.
, click this to see the options available.

There are 2 gallery options, with or without controls such as pause, play etc. Select the slideshow option you prefer (with or without controls) and your available galleries will appear. Simply select one of these galleries and the slideshow will be added to the page. The slideshow can be resized by clicking it with the mouse and dragging the corners out. It can also be positioned left or right using the text align icon in the toolbar. This will allow text to wrap around the slideshow.
If you wish to centralise the slideshow and add text above or below, you will need to set the slideshow to full width which can only be done from the HTML tab. To do this you will need to access HTML mode which is the 2nd left icon in the toolbar. Look for the section of code which says <img class="w4pwidget" style="width: xxxpx; change this width to the width you require. This width will depend on the overall site width and whether the navigation menu is set to the top or down one side.
For top navigation menu:
Site set at 900px width - set slideshow to 860px
Site set at 1200px width - set slideshow to 1100px
For navigation menu set to right or left:
Site set at 900px width - set slideshow to 660px
Site set at 1200px width - set slideshow to 900px
We do not recommend centreing a slideshow where the site is set to 100% width as it would display differently on different machines.
Please note a gallery must be set up prior to adding a slideshow. This has probably already been done on the wizard pages but if not instructions for adding a gallery are below.
You can create galleries specifically for slideshows to include a good selection of images from a cross section of services. Alternatively you may create galleries for specific services and add these to the relevant pages for example, Wedding, Portrait etc. Where you create a gallery to use in a slideshow but don't wish it to appear in the main Gallery section links you can hide it. Go to edit the gallery in question and check the box '' and then click 'Next' to save.
As with a slideshow above widgets can be added to each page using the editor. Simply go to edit the page in question and place the mouse cursor where you wish to add the widget. Select the Add Widgets/Slideshow icon ![]() and then the widget you wish to add from the drop down list. You may need to allow scripts to run on this page before it will allow you to add the widget. Click the bar that appears at the top of the screen if required and then select the icon again.
and then the widget you wish to add from the drop down list. You may need to allow scripts to run on this page before it will allow you to add the widget. Click the bar that appears at the top of the screen if required and then select the icon again.
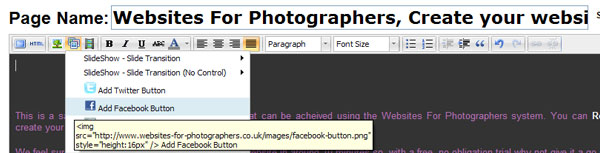
Selecting the Add Twitter or Facebook buttons will ask for your Twitter or Facebook url or page name which you enter into the box before clicking OK. The Twitter and / or Facebook button will then appear on the page. Clicking the Facebook share button will add this to the page automatically.
If you wish to add an events calendar to your website you must first create a calendar and add events to it. To do this you need to be registered as a photographer with www.ourweddingmemories.co.uk. If already registered, please login here. Once logged in click the Calendar Admin link in the top menu to change settings and add events. You will then see a snippet of code for adding the calendar to a website, from here simply copy the calendar id (calid=xxxx).
Back in your Websites For Photographers account, select the Widgets icon and then the 'Add our wedding memories calendar' link. A pop up box will ask you for your Our Wedding Memories Calendar ID. Here you simply enter the number from the above code after the = sign.
Ensure you click the Save button before navigating away from the page.
To add or edit a gallery go to the 'Galleries' section on the main account page or click the 'Galleries' tab in the top menu. Click the button 'Click here to view..... ' for either the Public or Client gallery option. This allows you to edit an existing gallery or create a new one.
A Public Gallery is intended to display your portfolio of images.
Client galleries allow you to sell your event images online via PayPal or payment by cheque.
Ecommerce is available as standard with all active accounts.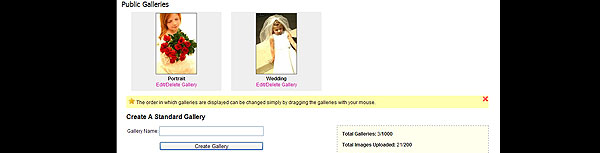
Either Click an existing gallery to Edit or enter a Gallery Name in the 'Create a Gallery' section.
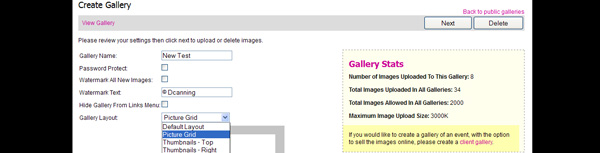
For either option you will be presented with the following screen.
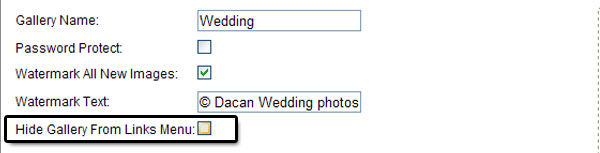
Enter or Edit gallery details including whether to password protect, add a watermark, enable the shopping cart.
Select the gallery layoutHere you have 6 options from Default Layout which is a list of thumbnail images which will open up in a light box effect when clicked. 4 filmstrip options with a large image and filmstrip of thumbnails to the top, bottom, left or right and a picture grid option. When selecting any filmstrip option a further check box will appear to select whether or not to allow automatic scrolling of the strip. Once all options are entered click 'Next'.
A further screen will be shown. Enter some information about the Gallery you are creating or editing and click the 'Browse and Upload Photos' button. Navigate to a folder on your hard drive to locate the images you wish to upload and select all those required. The system will upload all photos up to your image allocation limit.
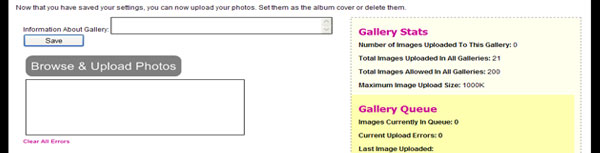
Uploaded images will display below the upload button and a progress section will appear displaying the image uploading and any errors. Errors could be displayed if an image file size is too large or you attempt to upload the same image twice. The maximum image upload size is currently set at 3Mb per image. The stats to the right will show the number of images uploaded and the allocation you have left.
Once you have used up your image allowance you will need to remove some images/galleries or add extra images. A message will display to Upgrade your account so you should Activate your account or 'Buy Extra Image Space'.
You can also Activate or buy extra image space at any time from the top menu. Instructions for Activating Your Website can be found here.
You can delete any images by rolling your mouse over them and clicking the ![]() icon. You can also set the album cover for the gallery in the same way and selecting the
icon. You can also set the album cover for the gallery in the same way and selecting the ![]() icon. The complete album can be deleted using the 'Delete' button at the top.
icon. The complete album can be deleted using the 'Delete' button at the top.
'Edit' takes you through the previous steps so you can make any required changes or upload extra images.
Images can be re-ordered simply by dragging the image to a different position. The gallery list can re-ordered in the same way.
If you wish to re-order all images within a gallery you have 3 options - Sort by Upload Date / File Name / Reverse current order. When on the 'Browse and Upload' page simply click the order option you require then click 'Save gallery Order'
If you don't wish a gallery to appear in the main Gallery section of the website you can hide it. Go to edit the gallery in question and check the box '' and then click 'Next' to save.
 Gallery Image ALT tags
You can add ALT tags to all gallery images individually. This will help with your SEO and google image search. An ALT tag should be a small description of the image in question. It is a good idea to enter a short phrase you would expect people to search for.
To add ALT tags you first need to upload the images to the gallery. Once uploaded, on the 'Browse and Upload' page you will see a small information icon ![]() in the bottom left of each thumbnail image. Click the icon and a pop up will appear where you can add the image description. Click SAVE. Please note the maximum number of characters that can be added is 40.
in the bottom left of each thumbnail image. Click the icon and a pop up will appear where you can add the image description. Click SAVE. Please note the maximum number of characters that can be added is 40.
The Alt description will be picked up by search engines and can be seen on the website when hovering over any thinmbnail image where a tag has been added as well as at the bottom of the lightbox image when a gallery has this feature.
Client galleries will still display the image name below each thumbnail but will include the Description in the pop up lightbox.
Prior to adding your first client gallery, you will be prompted to set up your shopping cart. A link to Manage Shopping Cart can be found in a number of locations such as your main account page, Galleries page and the Client Galleries section.
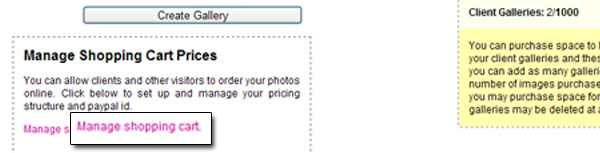
On the Manage Shopping Cart page you can add your PayPal id and Payee name for payment by cheque.
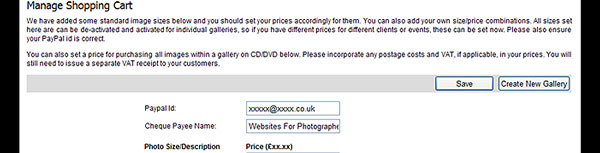
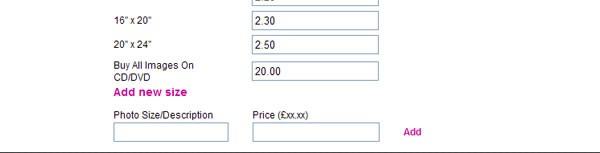
Then set your size / price combinations. We have added some standard sizes for you. You can also add new image size / price combinations. If you have different prices for the same image sizes for different events such as wedding or photo shoots, you should add these now. They can be edited at any time in the future.
When you create a client gallery and activate the shopping cart option you must select your image size / price combinations for that gallery. These options must be set for each gallery. If you add a new price to the Shopping cart you must then select it on the relevant gallery.
Once you have edited the Shopping Cart page remember to click Save.
You can enable and disable different size/price combinations for each gallery so different prices can be added for the same image sizes, depending on the actual event.
There is also the option to set a single price to 'Buy All Images On CD/DVD'.
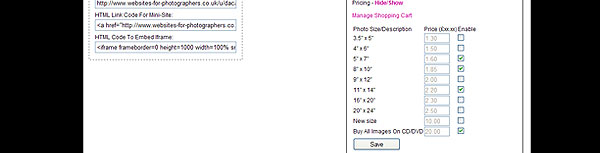
When you are happy with the prices set you can then return to the Client Gallery section and add a new gallery or select an existing one to edit. On the Gallery Edit page, ensure Enable shopping Cart is selected. You will see a link to Hide/Show pricing. Click this link and reveal the size / price combinations set previously.

Once the price options are revealed you can select or deselect the prices you want to set for that gallery. Click Save. Remember if you add a new price / size to your shopping cart and wish to use in any gallery they must be selected for each gallery individually.
Once you have set your prices for the Gallery and added other relevant detail click Next. As with the public galleries explained previously you can now add or edit the images for this gallery.
You can delete any images by rolling your mouse over them and clicking the ![]() icon. You can also set the album cover for the gallery in the same way and selecting the
icon. You can also set the album cover for the gallery in the same way and selecting the ![]() icon. The complete album can be deleted using the 'Delete' button at the top.
icon. The complete album can be deleted using the 'Delete' button at the top.
Any number of galleries can be added and as many images per gallery up to the maximum number of images purchased.
Once the maximum number of images is reached you will again be prompted to purchase extra images. Alternatively you can delete images from galleries or delete complete galleries as required.
Galleries can be re-ordered simply by dragging the gallery to a different position as can images in each gallery.
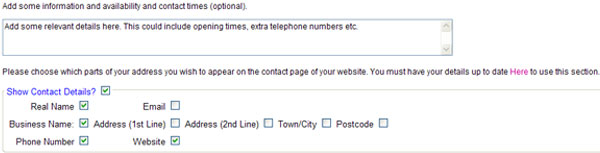
The contact page contains all your contact details and you can include or de-activate what you want. If you haven't completed all your contact details you should do so from the 'Edit User Details' tab.
To edit your website Contact page, from your Main Account page or the 'Create/Edit Pages' tab in the top menu click to 'Edit the contact form/page'.
A basic form is created by default which includes, Name, E-mail Address and Extra Details fields and will be live on the website once the wizard is complete. These settings cannot be removed. However, you can add further details to the contact page as required.
First add some basic text which will appear at the top of the page. This can include details such as opening times etc.
The next section allows you to select contact details you wish to appear on the page. If you just want to display the contact form on the page leave the check box 'Show contact details?' unchecked. If you wish to include some of this information, check this box and select the options you wish to appear. You can scroll down to see how the page will look with different items selected.
Next, select the items you wish to include in the contact form.
As mentioned, the default for the contact page includes a required name, e-mail address and further details field. To add to this you can also include location, budget and date required fields if required.
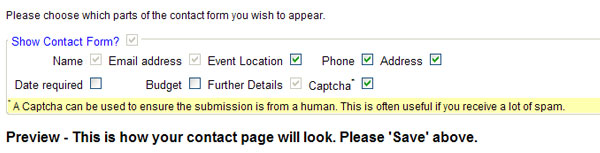
There is the option to include a CAPTCHA which stops automated spam submissions. This is switched on by default and can be switched off simply by deselecting the check box. If the CAPTCHA is not on it can be selected in the same way.
Save the changes and click to go back to the home page.
With each Websites for Photographers website a Links page comes as standard and is created during the initial set up process. This allows you to create links to external websites which may be useful to your visitors, partners you work alongside or for search engine promotion purposes where you would swap links with other websites. You will find 2 link already created on your links page, to Websites For Photographers and Our Wedding Memories (our dedicated wedding photographers directory).
You can edit your Links page from the main account page under the Edit other pages heading or from the Create/Edit Pages tab in the top menu.
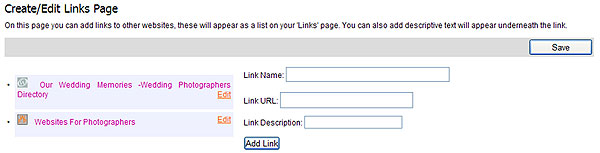
Click the Edit link to change or delete an existing link. Remember to click the Save button when editing a link.
To create a new link simply Enter the link name, the full website address of the page you are linking to (URL), add a description for the website you are linking to and then click the Add Link button. All links open in a new window.
From the main account page or 'Create/Edit Pages' tab you can edit the navigation menu. Click 'Edit your Navigation menu' to:
Re-order the menu
Categorise pages into sub-pages under a main page, creating a drop down list
Hide links from the website navigation bar
Rename any link
Add new links to external web sites or pages
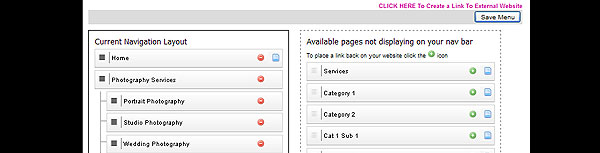
On this page you will see 2 blocks of links. To the left is the list of links currently displaying on your website navigation bar. To the right a list of pages available but not currently displaying on the nav bar.
To re-order a link, place your mouse over the ![]() icon to the left of the link you wish to move and drag to the required location. To make this a sub-page drag slightly to the right, past the indent line and release. This will create a drop down menu under the main link.
icon to the left of the link you wish to move and drag to the required location. To make this a sub-page drag slightly to the right, past the indent line and release. This will create a drop down menu under the main link.
To hide a link click the ![]() icon. Note: This will remove the link from the nav bar but will not delete the page. To place a link back on your navigation bar click the
icon. Note: This will remove the link from the nav bar but will not delete the page. To place a link back on your navigation bar click the ![]() icon alongside the link you wish to re-instate in the right hand list.
icon alongside the link you wish to re-instate in the right hand list.
To rename a link simply highlight the text of the link name you wish to change and re-type.
To add links to external pages or web sites, click the link at the top of the page saying 'CLICK HERE To Create a Link To External Website' add the Link Name into the first field and the full url or website address into the second field. The full url should include the http://. The link can then be set to open in the same window by default or if you wish it to open in a new window select this option before clicking the 'Add new link' button. After clicking the button the new link will appear in the links menu to the left and you can then position it as outlined above. You are also able to de-activate this link at anytime.
Before navigating away from the page, please click the 'Save Menu' button.
Unlimited pages can be added to your Websites For Photographers website. To create a new page click the link on the main account page under 'Personalise Your Website' or from the 'Create/Edit Pages' tab.
Here you have the usual options, Meta Content / SEO, Page Title, Link name and page content.
There is a Simple Editor option which allows you to easily add some text and upload one image. This will quickly create the page and add one image to the right hand side of the text. The layout and details can be edited later.
If you click on the 'Advanced Editor' option this will bring up the standard toolbar allowing all formatting options.
Once you have added the required content click the 'Create' button to Save the page.
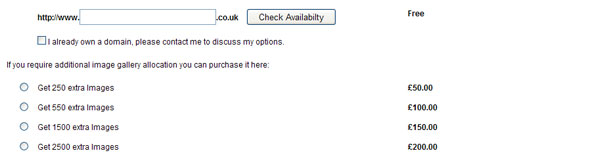
Once you are happy with your website then you need to activate it on it's own domain name. You can activate at any time by clicking the Activate / Renew link in the top menu from any page.
Enter the domain name you require and click 'Check Availability'. If this name is available this will be confirmed so you can move on by pressing the 'Activate and Purchase ....' button. If the name is not available please enter a different name.
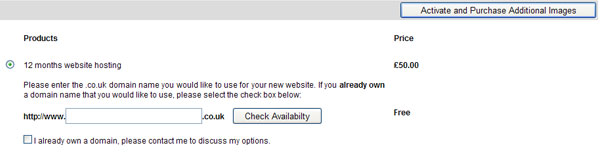
If you already own the domain name you wish to use we will assist in transferring it for you or explaining what settings need to be changed. This is usually a very simple process. Please enter the domain name you wish to use and Check the box 'I already own this domain' and then continue with your selections.
At this stage you can also select an email option. Either pop account or email forwarding to an email address of your choice.
If you require extra images make your selection now and once you are happy click the 'Activate and purchase additional images' button.
You will now be taken to the 'Confirm Order' page where you should complete your contact details before confirming your order. Once confirmed, click the purchase button and you will be taken to our secure servers provided by SagePay. Follow SagePay instructions and once payment is made you will be returned to the websites-for-photographers site to continue with your website.
Once we receive confirmation of payment we will register your requested domain, if available (or contact you to discuss your existing domain), and set your domain up on our servers. The process should take no more than 48 hours if we are registering a domain for you.
We will contact you to discuss how soon you wish your site to be activated on its own hosting account. It could be that you wish to wait until you have set up a number of extra galleries. Once agreed, your 12 month hosting account will begin from the date the web site/galleries are activated fully.
You can purchase extra space to host more images at any time in the future. Initial activation is for a 12 month period. If you purchase extra image space during the 12 month period the cost will be reduced accordingly. Should your account expire and you wish to renew at any time you simply need to click the Activate / Renew link and follow the instructions.
You can purchase extra images at anytime by clicking the 'Buy extra image space' link in the top menu. Select the number of extra images you require and go through the same payment process. When you return to the site you will be able to upload the extra images.
Videos can be added or 'embedded' into your site from Youtube or Vimeo. However, to add these you will need to access the HTML code for the page. This can be accessed from the HTML Tab in the editor toolbar. Carefully select the location where you would like to add the video and copy the embed code from the relevant service above to the location. If you are unsure of this please contact us for assistance using the contact link above.
You may also upload your own Flash videos created offline. Simply select the page you wish to add the video, click the Add Widget/Slideshow icon ![]() > Upload .swf file and then browse your hard drive for the Flash .swf file you wish to use. Flash videos can be created using Adobe Flash or other programs which can be found online. Search Google for Flash slideshow creators. Most have free trial versions so you can give them a go before deciding whether to purchase or not. Some of these programs are extremely simple to use where you select a template or screen, add the images you want to use and then export to .swf. However, we will be happy to create a Flash movie or slideshow for you so please contact us should you require this service.
> Upload .swf file and then browse your hard drive for the Flash .swf file you wish to use. Flash videos can be created using Adobe Flash or other programs which can be found online. Search Google for Flash slideshow creators. Most have free trial versions so you can give them a go before deciding whether to purchase or not. Some of these programs are extremely simple to use where you select a template or screen, add the images you want to use and then export to .swf. However, we will be happy to create a Flash movie or slideshow for you so please contact us should you require this service.
Please Note: Flash swf files are not supported on many devices and therefore your content may not be viewable by a large number of people. Apple iPads, iPhones etc do not support Flash. Therefore we recommend using an external service such as YouTube if you wish to display video files. If you simply wish to display a slideshow then you should use our standard Slideshow options.
The system has also been designed so that, if you already have a website that you are happy with, you can create galleries and link to them from your own website. We recommend selecting the mini-galleries option and adding a link to it from your own website. Here you would create the look of your new website similar to that of your current site and add galleries as required. Using the code for mini-galleries, which can be found on all individual gallery pages and the main Integrate page, you can link to these galleries and sell your images online directly from your existing website. Copy the relevant code into your web pages, this can be added to content on pages or your main links menu.
There is also an iFrame option where you can paste code directly into your web site pages if preferred.
If you add galleries to an existing website, you can still create a complete website-for-photographers website and the same galleries will be in use. You can run 2 websites side by side if you wish to see which is more effective. Editing and adding new galleries will automatically update the galleries on your website-for-photographers website and the galleries which are integrated in to an existing website. Creating and hosting the second website can mean an increase in search engine traffic as all pages can be optimised individually for different phrases, increasing the number of phrases where your business can be found. The new site can be link to your existing site using the external link option outlined above.
You can sell images directly from your website-for-photographers website using a PayPal account. To set up a paypal account, go to www.paypal.co.uk and follow the Sign Up link. You can create a basic account and selling will work on your website-for-photographers website when you add your paypal e-mail id on the 'Manage Shopping Cart' pages.
However, it is worthwhile setting up a business account and having it verified as you can then receive larger amounts on a monthly basis. Follow the instructions on the PayPal site and remember to enter your PayPal e-mail address correctly on the 'Manage Shopping Cart' page. Please contact us if you require support.
Finally, costs to you are kept to a minimum as you will be creating and editing the website yourself. All future updates can also be made in house so saving on any website maintenance costs. However, if you do not wish to spend your time editing and creating your website we will be happy to quote on any requirements, including developing a website specifically for your own business. Please contact us for further details.
For an extra charge we can also carry out any further work as required, including designing header images, creating bespoke menus or designing the look of your website around the content management system, if you feel the design tools don't offer enough flexibility.
Basically the system is designed so your website will cost as little or as much as your budget will allow. The more work you can do for yourself, the lower the cost.
Please click here to register and begin creating your website or contact us if you require further information.